The GUI-based tool ” TortoiseGit ” makes it easier to manage. In this column, we will explain how to download and install the open source Git clients “TortoiseGit” and “Japanese Language Pack”. If you install “Git for Windows”, you will be working while typing the command line in the terminal, but it is recommended to install “TortoiseGit” after learning the basic commands and usage of “Git for Windows”. To do.
table of contents
1. Download TortoiseGit
1.1. Download the TortoiseGit installation file
1.2. Download the TortoiseGit Japanese Language Pack
2. Install TortoiseGit
2.1. Run the installation file
2.2. TortoiseGit license verification
2.3. SSH client selection
2.4. Installation folder selection
3. Install TortoiseGit’s Japanese Language Pack
1. Download TortoiseGit
1.1. Download the TortoiseGit installation file
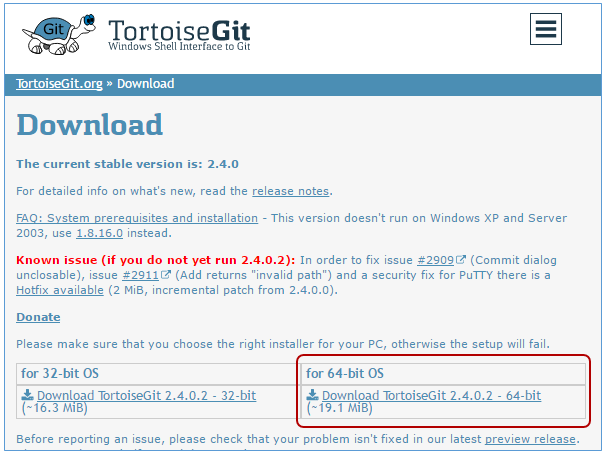
To use “TortoiseGit”, it is a prerequisite that ” Git for windows ” is installed. If you haven’t installed “Git” yet, please install “Git” by referring to ” How to install Git on Windows “.
Download the installer for your OS version from the “TortoiseGit” download page ( https://tortoisegit.org/ ). This time, we will install it on Windows 10 (64bit OS), so select “Download TortoiseGit 2.4.0.2 –64bit (~ 19.1 MiB)” from “for 64-bit OS”.
● TortoiseGit (Download)
Save the “TortoiseGit” installation file to any location on your PC.
1.2. Download TortoiseGit’s Japanese Language Pack
You can download the Japanese Language Pack from the “TortoiseGit” download page.
● “TortoiseGit” download page: https://tortoisegit.org/download/
Download the Japanese language pack from ” Language Packs ” at the bottom of the download site . An installer is prepared for each supported OS (32bit OS or 64bit OS), so click the corresponding package.
● Language Packs
![How to install TortoiseGit [Freelance engineer project information | Professional engineer]](https://proengineer.internous.co.jp/topics/wp-content/uploads/2017/08/git-install22.png)
Save “TortoiseGit-LanguagePack-XXXX-64bit-ja.msi” to any location on your PC. Install “TortoiseGit” and then apply the Japanese language pack.
2. Install TortoiseGit
2.1. Executing the installation file
Double-click the “TortoiseGit” installation file saved on your PC to start the installation. When you see the installation confirmation message, click OK to run the installer.
● TortoiseGit-2.4.0.2-64bit.msi
![How to install TortoiseGit [Freelance engineer project information | Professional engineer]](https://proengineer.internous.co.jp/topics/wp-content/uploads/2017/02/git-install14.png)
The TortoiseGit “Setup” dialog box will be displayed. Click the “Next” button.
● TortoiseGit- Setup
![How to install TortoiseGit [Freelance engineer project information | Professional engineer]](https://proengineer.internous.co.jp/topics/wp-content/uploads/2017/08/git-install23.png)
2.2. TortoiseGit license confirmation
Review your TortoiseGit license information and select the Next button.
● TortoiseGit –Information
![How to install TortoiseGit [Freelance engineer project information | Professional engineer]](https://proengineer.internous.co.jp/topics/wp-content/uploads/2017/08/git-install24.png)
2.3. SSH Client Selection
Select an SSH client. This time, I chose ” TortioseGitPlink “.
● TortoiseGit-Choose SSH Client
![How to install TortoiseGit [Freelance engineer project information | Professional engineer]](https://proengineer.internous.co.jp/topics/wp-content/uploads/2017/08/git-install25.png)
Click the Next button to continue.
2.4. Select installation folder
If you want to change the installation folder, click Browse under Custom Setup and select the desired folder. If you don’t need to change it, you can leave it as it is.
● TortoiseGit-Custom Setup
![How to install TortoiseGit [Freelance engineer project information | Professional engineer]](https://proengineer.internous.co.jp/topics/wp-content/uploads/2017/08/git-install27.png)
Now that you are ready to install, click the Install button.
● TortoiseGit-Ready to Install
![How to install TortoiseGit [Freelance engineer project information | Professional engineer]](https://proengineer.internous.co.jp/topics/wp-content/uploads/2017/08/git-install28.png)
After the installation is complete, the Japanese language package will be installed next. Uncheck ” Run first start wizard ” and click the ” Finish ” button.
● TortoiseGit
![How to install TortoiseGit [Freelance engineer project information | Professional engineer]](https://proengineer.internous.co.jp/topics/wp-content/uploads/2017/08/git-install29.png)
3. Install TortoiseGit’s Japanese Language Pack
Double-click the Language Pack installer saved on your PC to start the installation.
● TortoiseGit-LanguagePack-XXXX-64bit-ja.msi
![How to install TortoiseGit [Freelance engineer project information | Professional engineer]](https://proengineer.internous.co.jp/topics/wp-content/uploads/2017/02/git-install17.png)
When the setup wizard opens, click the ” Next ” button.
● TortoiseGit-LanguagePack-XXXX-64bit-ja.msi
The installation will be completed immediately, so click the ” Finish ” button to check if “TortoiseGit” is installed correctly.
● TortoiseGit-LanguagePack-XXXX-64bit-ja.msi
Right-click in any folder and check that there are “Git clone (duplicate) …”, “Git create repository here (Y)”, and “TortoiseGit” in the menu.
Click [TortoiseGit] → [Settings] to set Japanese.
● TortoiseGit (Settings)
Click the [General]-> [Language] pull-down menu in the “Settings” window, select [Japanese], and click the ” OK ” button.
● TortoiseGit (Settings)
![How to install TortoiseGit [Freelance engineer project information | Professional engineer]](https://proengineer.internous.co.jp/topics/wp-content/uploads/2017/08/git-install31.png)